Deployment management plays a vital role in any modern DevOps workflow. Teams often encounter challenges when updating applications or rolling out changes across distributed systems. Reliable and consistent tools are essential to ensure deployments are successful and repeatable. Understanding what is CodeDeploy in AWS will help teams to take full advantage of automated deployment processes within the cloud environment. AWS CodeDeploy is a fully managed service that automates software deployments to a variety of compute services, such as Amazon EC2, AWS Lambda, and on-premises servers. This tool improves control, reduces downtime, and ensures safer application updates, making it a valuable asset in any DevOps strategy.
Since you now have a basic understanding of what is CodeDeploy in AWS, it’s time to move forward with a practical guide. Let’s begin with an AWS CodeDeploy tutorial in a local environment to help you see how it works in action. Setting up CodeDeploy locally allows you to test deployment configurations, scripts, and hooks before pushing changes to a live production environment. This approach not only minimizes risk but also gives you hands-on experience with the deployment life cycle that CodeDeploy manages.
Table of Contents
Note: I had already published short blog post in hashnode few months back. Blog Post.
Setting the Foundation: Local Deployment
Many developers find it helpful to first test deployments locally. This approach gives full visibility into the process and helps prevent errors before pushing to production. You need to note that all AWS services can not be tested with the codedeploy-local.
Installing CodeDeploy Agent
At first, you need to install the CodeDeploy Agent on your system. This agent manages the deployment process by interpreting a file called appspec.yml, which defines what happens at each stage of deployment.
If you’re using Ubuntu or Amazon Linux, follow the official AWS instructions to install the agent properly. It is essential to keep this agent running and updated.
CodeDeploy-local
AWS provides CodeDeploy-local as a lightweight tool for testing deployment logic without connecting to the AWS cloud. It helps simulate the entire process using your local machine, which is especially useful during development.
To configure it correctly:
- Use the default paths for simplicity, unless you specifically need to customize directories
- Always run commands with sudo for permission consistency
- Refer to this AWS blog post for best practices and CLI aliasing
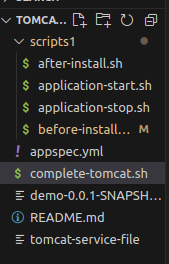
Project Layout and AppSpec Essentials
The deployment project should include a war file for the application (e.g., demo-0.0.1-SNAPSHOT.war) and an appspec.yml file. This YAML file outlines all actions the CodeDeploy agent must perform during the deployment lifecycle. The file should be in .yml.
The AppSpec File: Defining the Deployment Flow
Understanding the appspec.yml is critical. The structure typically includes:
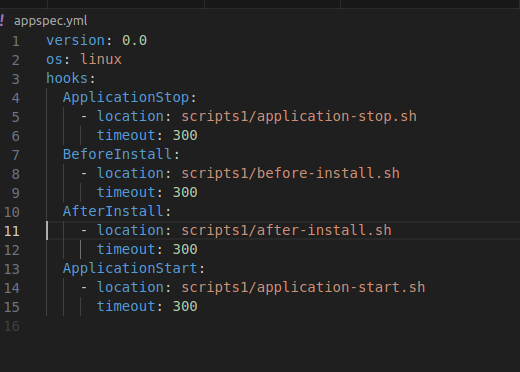
- version This section specifies the version of the AppSpec file. Do not change this value. It is required. Currently, the only allowed value is
0.0. It is reserved by CodeDeploy for future use. - os This section specifies the operating system value of the instance to which you deploy. It is required. The following values can be specified:
- linux – The instance is an Amazon Linux, Ubuntu Server, or RHEL instance.
- windows – The instance is a Windows Server instance.
- hooks This section specifies scripts to run at specific deployment lifecycle events during the deployment. For more information, see AppSpec ‘hooks’ section.
In our case, there are four defined life cycle events.
You may like: Automating MFA in Amazon EC2 Instance with SELinux Enabled
Lifecycle Events and What They Do
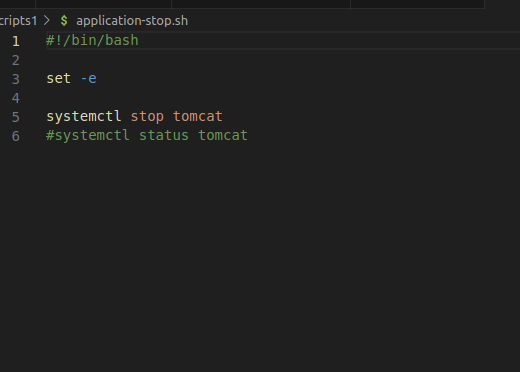
1. ApplicationStop
This script is used to stop any running instance of Tomcat before new files are deployed. A typical version might include:
2. BeforeInstall
This is a setup script. It checks if the Tomcat user and group exist, creates them if not, and installs Tomcat if missing. It also configures proper permissions and sets up the Tomcat service.
#!/bin/bash

set -e

CATALINA_DIR="/home/mahesh" #my tomcat catalina directory
TOMCAT_VERSION_NUMBER=9.0.78

echo "Tomcat group and user are going to be created."
TOMCAT_GROUP="tomcat"
TOMCAT_USER="tomcat"

# Create the Tomcat group
if ! getent group "${TOMCAT_GROUP}" > /dev/null; then
    groupadd "${TOMCAT_GROUP}"
fi

# Create the Tomcat user without login shell access
if ! getent passwd "${TOMCAT_USER}" > /dev/null; then
  useradd -M -g "${TOMCAT_GROUP}" -s /usr/sbin/nologin "${TOMCAT_USER}"
fi

# Print a message indicating the successful creation of the group and user
echo "group and user got created successfully"

#make PROJECT_HOME directory
if [ -d "${PROJECT_HOME}" ];
then
  rm -rf ${PROJECT_HOME}
  echo "removed PROJECT_HOME"
  mkdir ${PROJECT_HOME}
  echo "created PROJECT_HOME"
else
  mkdir ${PROJECT_HOME}
fi

#
#######changed the owner group
chmod 755 -R ${PROJECT_HOME}
chown tomcat:tomcat -R ${PROJECT_HOME}
echo "made the owner tomcat and changed the mode to 755"

##check if tomcat is already installed or not
if [[ -d "${CATALINA_DIR}/apache-tomcat-${TOMCAT_VERSION_NUMBER}" ]];
then
    echo "Tomcat is installed at ${CATALINA_DIR}/apache-tomcat-${TOMCAT_VERSION_NUMBER}"
    echo "no need to download"
else
    echo "Tomcat is not installed at ${CATALINA_DIR}/apache-tomcat-${TOMCAT_VERSION_NUMBER}"

    ###download tomcat
    wget <https://downloads.apache.org/tomcat/tomcat-9/v${TOMCAT_VERSION_NUMBER}/bin/apache-tomcat-${TOMCAT_VERSION_NUMBER}.tar.gz>

    ####extract tomcat
    tar -xzvf apache-tomcat-${TOMCAT_VERSION_NUMBER}.tar.gz -C ${CATALINA_DIR}
    rm -rf apache-tomcat-${TOMCAT_VERSION_NUMBER}.tar.gz

    ###permission to tomcat user
    #need to change owner and group from mahesh to tomcat in the final one
    chmod 755 -R "${CATALINA_DIR}/apache-tomcat-${TOMCAT_VERSION_NUMBER}"
    chown tomcat:tomcat -R "${CATALINA_DIR}/apache-tomcat-${TOMCAT_VERSION_NUMBER}"
fi

if [[ -f "/etc/systemd/system/tomcat.service" ]];
then
#    cp -f tomcat-service-file /etc/systemd/system/tomcat.service
    echo "found service file but copied new service file"
    chmod 755 /etc/systemd/system/tomcat.service
    chown tomcat:tomcat /etc/systemd/system/tomcat.service
    echo "changed user and permission for service file"
    systemctl daemon-reload
    systemctl enable tomcat
    echo "service found"
else
    echo "no service not found"
    ## description: Tomcat startup/ shutdown script
    # process name: tomcat

    cp -f tomcat-service-file /etc/systemd/system/tomcat.service
    echo "copied service file"

    chmod 755 /etc/systemd/system/tomcat.service
    chown tomcat:tomcat /etc/systemd/system/tomcat.service
    echo "changed user and permission for service file"
    systemctl daemon-reload
    systemctl enable tomcat
fi
This stage ensures the environment is ready for deployment.
3. Install
You will generally not find this hook written like that before install and after install. This hook is present similarly like os and version. The main job we perform in the install hook is copy the required files , or directories.
#!/bin/bash

set -e

version: 0.0
os: linux
files:
  - source: /
    destination: /home/mahesh/

hooks:
  BeforeInstall:
4. AfterInstall
At this point, the deployment files are in place. The script removes any old deployment artifacts, copies the new .war file to the correct Tomcat webapps folder, and sets it up as ROOT.war if needed.
#!/bin/bash

set -e

DEPLOY_TO_ROOT='true'
WAR_STAGED_LOCATION="/home/mahesh/Desktop/projects/tomcat-codedeploy-test/demo-0.0.1-SNAPSHOT.war"

CATALINA_DIR="/home/mahesh"
TOMCAT_VERSION_NUMBER=9.0.78

# In Tomcat, ROOT.war maps to the server root
if [[ "$DEPLOY_TO_ROOT" = 'true' ]];
then
    CONTEXT_PATH='ROOT'
fi

# Remove unpacked application artifacts
if [[ -f "${CATALINA_DIR}/apache-tomcat-${TOMCAT_VERSION_NUMBER}/webapps/${CONTEXT_PATH}.war" ]];
then
   rm "${CATALINA_DIR}/apache-tomcat-${TOMCAT_VERSION_NUMBER}/webapps/${CONTEXT_PATH}.war"
fi
if [[ -d "${CATALINA_DIR}/apache-tomcat-${TOMCAT_VERSION_NUMBER}/webapps/${CONTEXT_PATH}" ]];
then
   rm -rf "${CATALINA_DIR}/apache-tomcat-${TOMCAT_VERSION_NUMBER}/webapps/${CONTEXT_PATH}"
fi

# Copy the WAR fsile to the webapps directory
cp "${WAR_STAGED_LOCATION}" "${CATALINA_DIR}/apache-tomcat-${TOMCAT_VERSION_NUMBER}/webapps/${CONTEXT_PATH}.war"
4. ApplicationStart
Finally, this script starts the Tomcat service again:
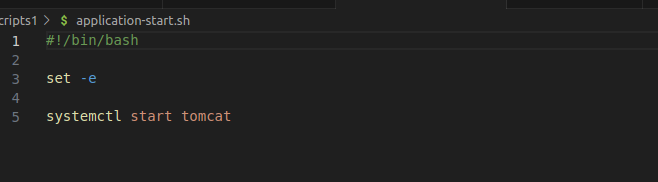
You can customize it based on your deployment needs.
Testing It Locally
Once everything is ready, and you’re in the root directory of the project, run:
codedeploy-local #run it from the root where appspec.yml file is presentThis command will simulate an entire deployment lifecycle using the AppSpec file and scripts you’ve written.
Check out: The Ultimate Guide to Writing Assignments Effectively for Students
Transitioning to AWS CodeDeploy
Local testing helps catch issues early. But when you’re ready to scale or automate production releases, it’s time to move to AWS CodeDeploy.
What Is CodeDeploy in AWS?
AWS CodeDeploy is a fully managed service that automates software deployments across several compute services like EC2, Lambda, and ECS. It uses the same logic you practiced locally, but adds powerful cloud capabilities.
By using CodeDeploy in AWS, you can:
- Deploy to thousands of EC2 instances in parallel
- Run blue/green deployments to avoid downtime
- Integrate with CI/CD pipelines such as CodePipeline or Jenkins
- Automatically roll back on failure
- Monitor every deployment step in real time via the AWS console
How Does AWS CodeDeploy Work?
Understanding how AWS CodeDeploy works can help you create more reliable deployments.
1. Upload Application Revision
Your project folder, including the war file, AppSpec file, and scripts, should be zipped and uploaded to either an Amazon S3 bucket or a GitHub repository.
2. Define the Application and Deployment Group
Inside the AWS CodeDeploy console:
- Create a new application (e.g., TomcatWebApp)
- Create a deployment group by tagging EC2 instances or providing a list
- Choose the compute platform (EC2/On-premises or Lambda)
You can also have other different options like load balancing, and rollback.
This group defines where and how the deployment takes place.
3. IAM Roles and Permissions
Assign a service role to CodeDeploy with the required permissions. Similarly, the EC2 instances must have an instance profile that allows communication with the CodeDeploy service.
4. Launch the Deployment
Once everything is configured, trigger the deployment through the AWS Console or CLI.
Here is the command to trigger a deployment using the AWS CLI:
aws deploy create-deployment \\
  --application-name TomcatWebApp \\
  --deployment-group-name TomcatGroup \\
  --s3-location bucket=my-bucket,bundleType=zip,key=tomcat-app.zip \\
  --deployment-config-name CodeDeployDefault.AllAtOnce \\
  --description "Deploying latest Tomcat application"
This command launches the deployment, and you can monitor the progress in real-time.
Monitoring and Rollbacks
AWS CodeDeploy provides:
- CloudWatch Logs for each lifecycle event
- Automatic rollback if health checks fail
- Notifications through SNS or EventBridge
This ensures safer deployments with full visibility and control.
Is AWS CodeDeploy Free?
AWS CodeDeploy offers a generous free tier, especially for deployments to Amazon EC2 instances. When using CodeDeploy with EC2 or on-premises servers, there are no additional charges beyond what you pay for the underlying resources (like EC2 or S3). However, if you use CodeDeploy with AWS Lambda or ECS (Amazon Elastic Container Service), pricing may apply based on usage. This makes it an excellent option for startups, students, or small teams wanting to implement CI/CD pipelines without increasing operational costs. You can explore the full pricing details on the official AWS CodeDeploy pricing page.
From Local to Cloud-Scale Automation with CodeDeploy
Using CodeDeploy in a local environment offers a practical foundation for understanding deployment workflows. A step-by-step local setup helps identify issues early, build confidence with AppSpec scripts, and prepare for production-level operations. Once the process becomes stable locally, deployment to AWS becomes much easier and more reliable.
A solid grasp of what is CodeDeploy in AWS allows you to fully leverage its capabilities in the cloud. The service brings automation, consistency, and scalability to application deployments. Manual updates, inconsistent releases, and downtime can be significantly reduced. Whether managing one server or hundreds, CodeDeploy ensures that deployments are predictable, controlled, and aligned with DevOps best practices.
Now that you’ve seen how AWS CodeDeploy works, from local testing to cloud-scale deployment, you’re ready to build robust pipelines that deliver fast and fail-safe. The journey begins on your terminal, but ends in the cloud.
If you’re planning to deploy your projects on AWS or need help using AWS CodeDeploy for assignments or real-world applications, feel free to reach out to us at guidekorner@gmail.com. We’re here to help! Please leave your feedback.

![Easy Python Projects for Students with Source Code [2025]](https://www.guidekorner.com/wp-content/uploads/2025/06/image-51-150x150.png)